Dragonfly v2.5.0 has been released
· 6 min read
Dragonfly graduates after demonstrating production readiness, powering container and AI workloads at scale.
Key Highlights:
SAN FRANCISCO, Calif. – January 14, 2026 – The Cloud Native Computing Foundation® (CNCF®), which builds sustainable ecosystems for cloud native software, today announced the graduation of Dragonfly, a cloud native open source image and file distribution system designed to solve cloud native image distribution in Kubernetes-centered applications.
“Dragonfly’s graduation reflects the project’s maturity, broad industry adoption and critical role in scaling cloud native infrastructure,” said Chris Aniszczyk, CTO, CNCF. “It’s especially exciting to see the project’s impact in accelerating image distribution and meeting the data demands of AI workloads. We’re proud to support a community that continues to push forward scalable, efficient and open solutions.”
Dragonfly delivers efficient, stable, and secure data distribution and acceleration powered by peer-to-peer (P2P) technology. It aims to provide a best‑practice, standards‑based solution for cloud native architectures to improve large‑scale delivery of files, container images, OCI artifacts, AI models, caches, logs, and dependencies.
Dragonfly runs on Kubernetes and is installed via Helm, with its official chart available on Artifact Hub. It also includes tools like Prometheus for tracking performance, OpenTelemetry for collecting and sharing data, and gRPC for rapid communication between parts. Enhancing Harbor capability to distribute images and OCI artifacts through the preheat feature. In the GenAI era, as model serving becomes increasingly important, Dragonfly delivers even more value by distributing AI model artifacts defined by the ModelPack specification.
Dragonfly continues to advance container image distribution, supporting tens of millions of container launches per day in production, saving storage bandwidth by up to 90%, and reducing launch time from minutes to seconds, with large-scale adoption across different cloud native scenarios.
Dragonfly is also driving standards and acceleration solutions for distributing both AI model weights and optimized image layout in AI workloads. The technology reduces data loading for large-scale AI applications and enables the distribution of model weights at a hundred-terabyte scale to hundreds of nodes in minutes. As AI continues to integrate into operations, Dragonfly becomes crucial to powering large-scale AI workloads.
Dragonfly was open-sourced by Alibaba Group in November 2017. It then joined the CNCF as a Sandbox project in October 2018. During this stage, Dragonfly 1.0 became production-ready in November 2019 and the Dragonfly subproject, Nydus, was open-sourced in January 2020. Dragonfly then reached Incubation phase in April 2020, with Dragonfly 2.0 later released in 2021.
Since then, the community has significantly matured and attracted hundreds of contributors from organizations such as Ant Group, Alibaba Cloud, ByteDance, Kuaishou, Intel, Datadog, Zhipu AI, and more, who use Dragonfly to deliver efficient image and AI model distribution.
Since joining CNCF, contributors have increased by 500%, from 45 individuals across 5 companies to 271 individuals across over 130 companies. Commit activity has grown by over 3,000%, from roughly 800 to 26,000 commits, and the number of overall participants has reached 1,890.
Dragonfly will accelerate AI model weight distribution based on RDMA, improving throughput and reducing end-to-end latency. It will also optimize image layout to reduce data loading time for large-scale AI workloads. A load-aware two-phase scheduling will be introduced, leveraging collaboration between the scheduler and clients to enhance overall distribution efficiency. To provide more stable and reliable services, Dragonfly will support automatic updates and fault recovery, ensuring stable operation of all components during traffic bursts while controlling back-to-source traffic.
To officially graduate from Incubation status, the Dragonfly team enhanced the election policy, clarified the maintainer lifecycle, standardized the contribution process, defined the community ladder, and added community guidelines for subprojects. The graduation process is supported by CNCF’s Technical Oversight Committee (TOC) sponsors for Dragonfly, Karena Angell and Kevin Wang, who conducted a thorough technical due diligence with Dragonfly’s project maintainers.
Additionally, a third-party security audit of Dragonfly was conducted. The Dragonfly team along with the guidance of their TOC sponsors, completed both a self-assessment and a joint assessment with CNCF TAG Security, then collaborated with the Dragonfly security team on a threat model. After this, the team improved the project’s security policy.
Learn more about Dragonfly and join the community: https://d7y.io/
“I am thrilled, as the founder of Dragonfly, to announce its graduation from the CNCF. We are grateful to each and every open source contributor in the community, whose tenacity and commitment have enabled Dragonfly to reach its current state. Dragonfly was created to resolve Alibaba Group’s challenges with ultra-large-scale file distribution and was open-sourced in 2017. Looking back on this journey over the past eight years, every step has embodied the open source spirit and the tireless efforts of the many contributors. This graduation marks a new starting point for Dragonfly. I hope that the project will embark on a new journey, continue to explore more possibilities in the field of data distribution, and provide greater value!”
—Zuozheng Hu, founder of Dragonfly, emeritus maintainer
“I am delighted that Dragonfly is now a CNCF graduated project. This is a significant milestone, reflecting the maturity of the community, the trust of end users, and the reliability of the service. In the future, with the support of CNCF, the Dragonfly team will work together to drive the community’s sustainable growth and attract more contributors. Facing the challenges of large-scale model distribution and data distribution in the GenAI era, our team will continue to explore the future of data distribution within the cloud native ecosystem.”
—Wenbo Qi (Gaius), core Dragonfly maintainer
“Since open-sourcing in 2020, Nydus, alongside Dragonfly, has been validated at production scale. Dragonfly’s graduation is a key milestone for Nydus as a subproject, allowing the project to continue improving the image filesystem’s usability and performance. It will also allow us to further explore ecosystem standardization and AGI use cases that will advance the underlying infrastructure.”
—Song Yan, core Nydus maintainer
“The combination of Dragonfly and Nydus substantially shortens launch times for container images and AI models, enhancing system resilience and efficiency.”
—Jiang Liu, Nydus maintainer
“Thanks to the community’s collective efforts, Dragonfly has evolved from a tool for accelerating container images into a secure and stable distribution system widely adopted by many enterprises. Continuous improvements in usability and stability enable the project to support a variety of scenarios, including CI/CD, edge computing, and AI. New challenges are emerging for the distribution of model weights and data in the age of AI. Dragonfly is becoming a key infrastructure in mitigating these challenges. With the support of the CNCF, Dragonfly will continue to drive the future evolution of cloud native distribution technologies.”
—Yuan Yang, Dragonfly maintainer
Dragonfly v2.3.0 is released! 🎉🎉🎉 Thanks the contributors who made this release happen and welcome you to visit d7y.io website.

CNCF projects highlighted in this post, and migrated by mingcheng.
Dragonfly v2.2.0 is released! 🎉🎉🎉 Thanks the contributors who made this release happen and welcome you to visit d7y.io website.
CNCF projects highlighted in this post, and migrated by mingcheng.
Project post by Yufei Chen, Miao Hao, and Min Huang, Dragonfly project
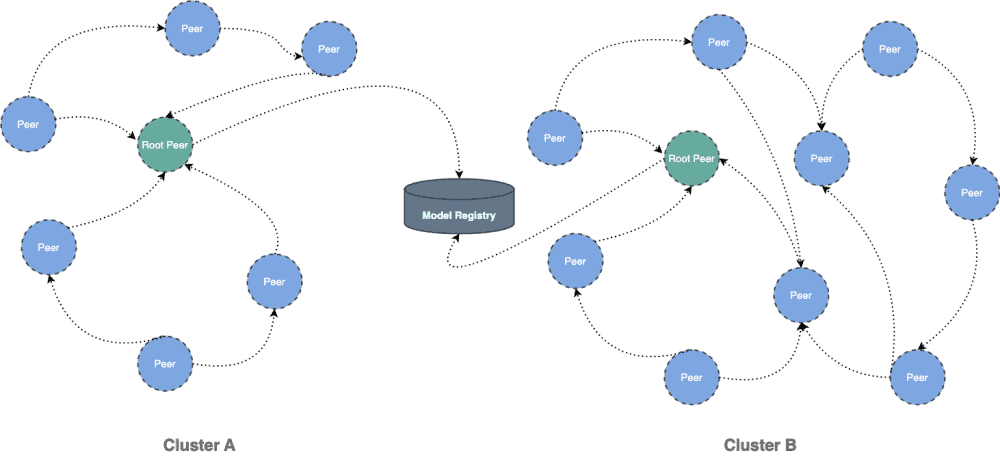
This document will help you experience how to use dragonfly with TritonServe. During the downloading of models, the file size is large and there are many services downloading the files at the same time. The bandwidth of the storage will reach the limit and the download will be slow.
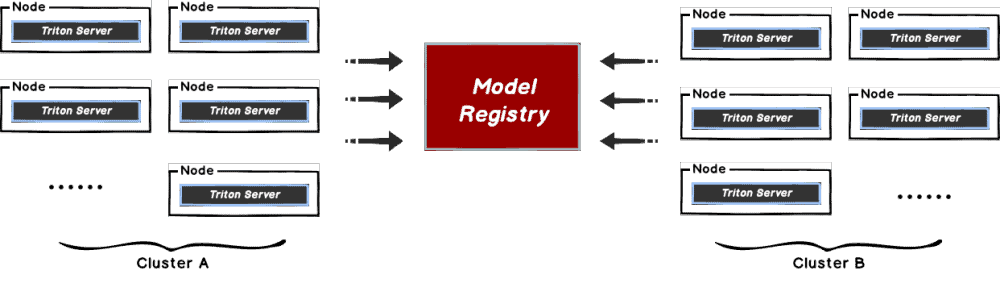
Dragonfly can be used to eliminate the bandwidth limit of the storage through P2P technology, thereby accelerating file downloading.
CNCF projects highlighted in this post, and migrated by mingcheng.
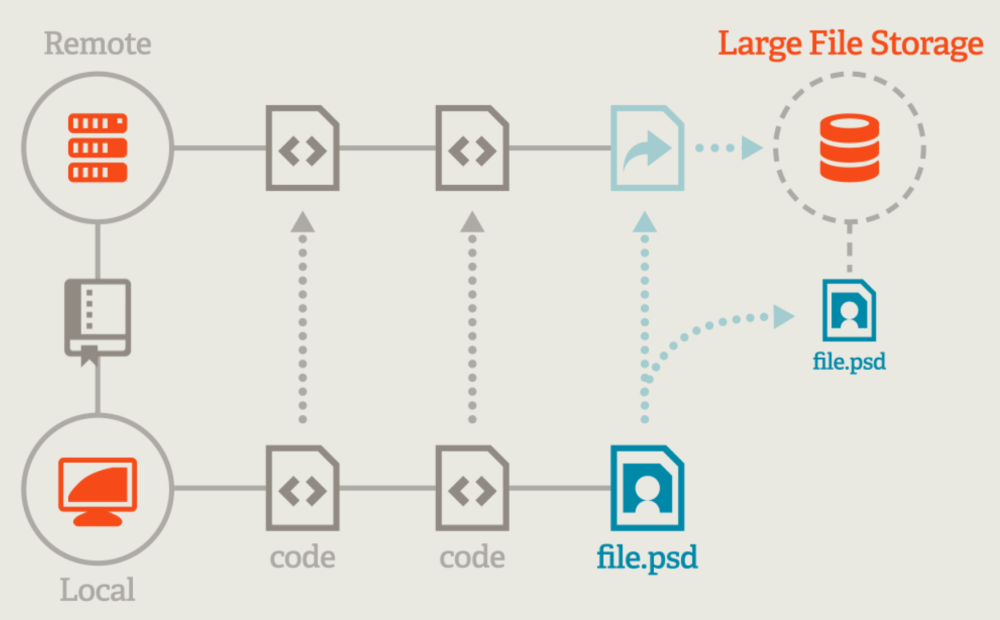
Git LFS (Large File Storage) is an open-source extension for Git that enables users to handle large files more efficiently in Git repositories. Git is a version control system designed primarily for text files such as source code and it can become less efficient when dealing with large binary files like audio, videos, datasets, graphics and other large assets. These files can significantly increase the size of a repository and make cloning and fetching operations slow.

Git LFS addresses this issue by storing these large files on a separate server and replacing them in the Git repository with small placeholder files (pointers). When a user clones or pulls from the repository, Git LFS fetches the large files from the LFS server as needed rather than downloading all the large files with the initial clone of the repository. For specifications, please refer to the Git LFS Specification. The server is implemented based on the HTTP protocol, refer to Git LFS API. Usually Git LFS’s content storage uses object storage to store large files.
GitHub and GitLab usually manage large files based on Git LFS.
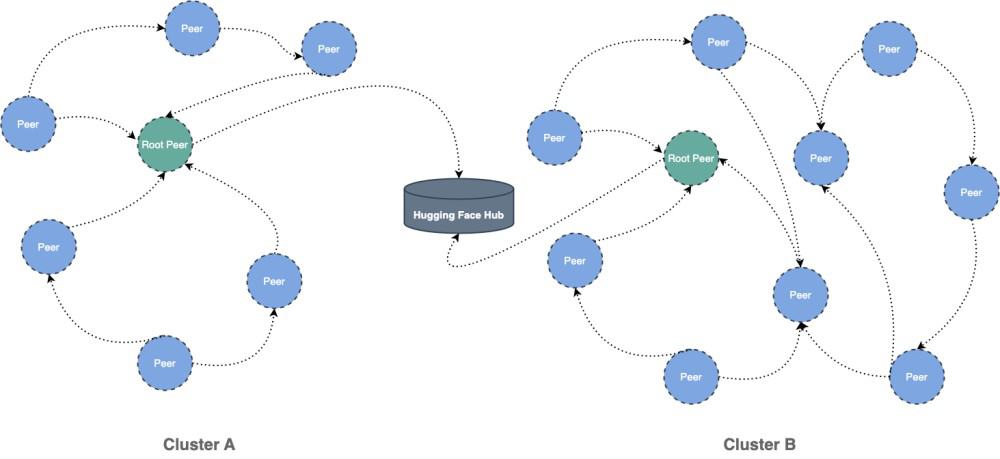
Large files of models and datasets in AI are usually managed based on Git LFS. Hugging Face Hub and ModelScope Hub manage models and datasets based on Git LFS.
Hugging Face Hub’s Python Library implements Git LFS to download models and datasets. Hugging Face Hub’s Python Library distributes models and datasets to accelerate, refer to Hugging Face accelerates distribution of models and datasets based on Dragonfly.
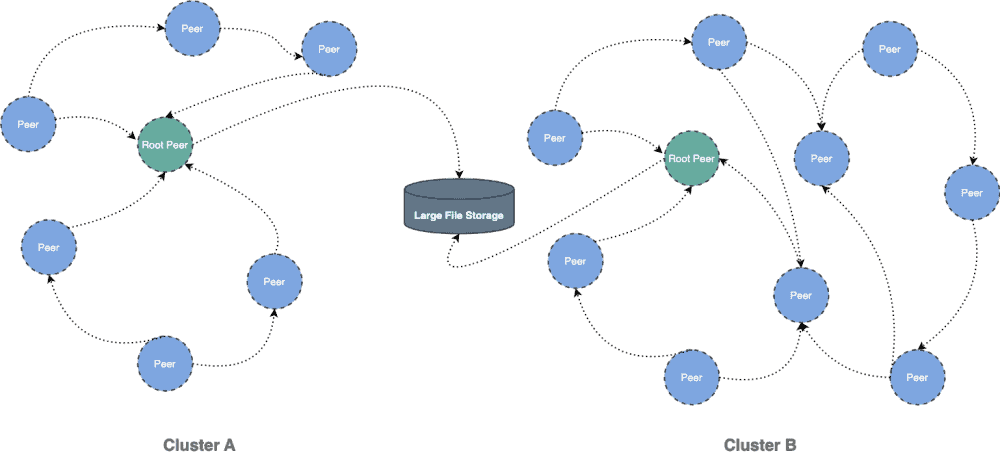
This document will help you experience how to use dragonfly with Git LFS. During the downloading of large files, the file size is large and there are many services downloading the larges files at the same time. The bandwidth of the storage will reach the limit and the download will be slow.
Dragonfly can be used to eliminate the bandwidth limit of the storage through P2P technology, thereby accelerating large files downloading.
CNCF projects highlighted in this post, and migrated by mingcheng.
This document will help you experience how to use dragonfly with TorchServe. During the downloading of models, the file size is large and there are many services downloading the files at the same time. The bandwidth of the storage will reach the limit and the download will be slow.
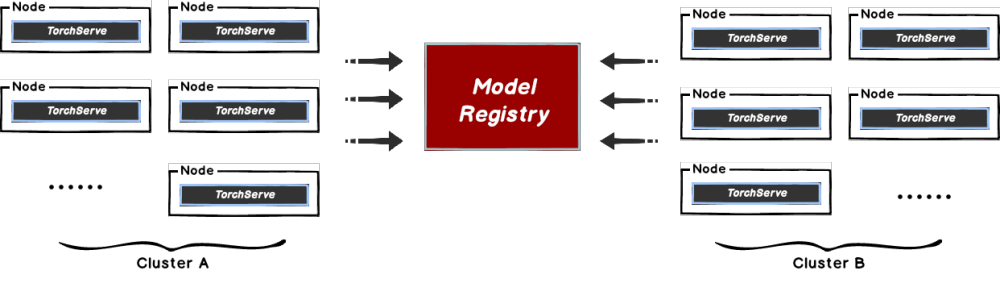
Dragonfly can be used to eliminate the bandwidth limit of the storage through P2P technology, thereby accelerating file downloading.

CNCF projects highlighted in this post, and migrated by mingcheng.
This document will help you experience how to use dragonfly with hugging face. During the downloading of datasets or models, the file size is large and there are many services downloading the files at the same time. The bandwidth of the storage will reach the limit and the download will be slow.
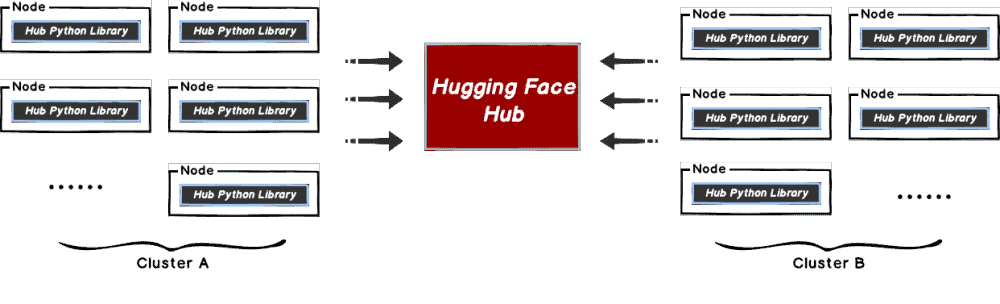
Dragonfly can be used to eliminate the bandwidth limit of the storage through P2P technology, thereby accelerating file downloading.
This summer, over four engineer weeks, Trail of Bits and OSTIF collaborated on a security audit of dragonfly. A CNCF Incubating Project, dragonfly functions as file distribution for peer-to-peer technologies. Included in the scope was the sub-project Nydus’s repository that works in image distribution. The engagement was outlined and framed around several goals relevant to the security and longevity of the project as it moves towards graduation.
The Trail of Bits audit team approached the audit by using static and manual testing with automated and manual processes. By introducing semgrep and CodeQL tooling, performing a manual review of client, scheduler, and manager code, and fuzz testing on the gRPC handlers, the audit team was able to identify a variety of findings for the project to improve their security. In focusing efforts on high-level business logic and externally accessible endpoints, the Trail of Bits audit team was able to direct their focus during the audit and provide guidance and recommendations for dragonfly’s future work.
Recorded in the audit report are 19 findings. Five of the findings were ranked as high, one as medium, four low, five informational, and four were considered undetermined. Nine of the findings were categorized as Data Validation, three of which were high severity. Ranked and reviewed as well was dragonfly’s Codebase Maturity, comprising eleven aspects of project code which are analyzed individually in the report.
This is a large project and could not be reviewed in total due to time constraints and scope. multiple specialized features were outside the scope of this audit for those reasons. this project is a great opportunity for continued audit work to improve and elevate code and harden security before graduation. Ongoing efforts for security is critical, as security is a moving target.